As a business owner, a sale helps you clear stock and bring in buyers, but changing every price by hand takes time. Sales Hub lets you set discounts, coupons and countdowns from one page, and Bumpa turns the prices on and off for you. In this article, learn how to create a sale, add offers and read your sales report.
Take a fashion boutique in Lagos: It can run 15% off party dresses from 15 to 31 December without changing every price by hand or having to change them back in January.
Sales Hub replaced the old Discounts & Coupons page. That page was retired on 3 August 2026. Create all new discounts and coupons in Sales Hub (Sales & Marketing, then Sales Hub).
Sales Hub helps you:
Clear stock with a clear plan. A named sale with clear dates ("Christmas Clearance, ends 31 Dec") looks organised. Customers trust fixed sale prices more than prices that keep changing.
Reward your regular customers. Give your WhatsApp broadcast list or Instagram followers their own code. They get a better price, and other buyers still pay the normal price.
Give buyers a reason to act now. An end date (and a countdown, if you add one) helps customers buy today instead of saying "I'll come back next week".
See what worked. After the sale, you can see orders, revenue, new customers and products sold for that sale. Next time you can plan with those numbers.
Inside each sale, you can add these offers:
Discount: the price drops for everybody, no code needed.
Coupon: only customers who type your code at checkout get the offer.
Countdown: a timer on your website that builds excitement before or during the sale.
You will also see a Wholesale card. That is for bulk buyer prices, which work a bit differently and are not covered in this article.
Here is how other shop owners use each offer type.
Tip: You can mix offers in one sale. For a Christmas clearance you might add a Discount on last season's stock, plus a Coupon for your top customers to get a little extra off the whole cart.
1. Get Your Store Sale Ready
A sale goes wrong when a customer pays for something you do not have, or when your website still shows an old banner. Bumpa gives you a short checklist to avoid that.
To run the checklist, follow these steps:
Open Create New Sale (see section 3). You will see a banner that says Be sales ready to avoid headaches.
Click Run Checklist to Get your store sale-ready.
Work through the five items below. Each one has a button that takes you straight to the right page.
Review your products: check prices, photos, descriptions and stock. Button: Review Your Products.
Tell your customers your sale is coming: send an SMS or email campaign. Button: Create Campaign.
Prepare your website: update your banner or feature your sale products. Button: Customize Store.
Turn on Reserve Inventory: hold stock while a customer is checking out, so two people can't buy your last item. Button: Turn On Reserve Inventory.
Create content for your sale: plan your posts, Status updates and videos.
Tick each item as you finish it, then click I'm Ready. Want more tools, such as countdown timers or bundles? Click View Extensions at the bottom of the checklist.
Reserve Inventory matters most for small stock items. If you have only three of that ₦45,000 bag, you don't want four people paying for it during a payday rush.
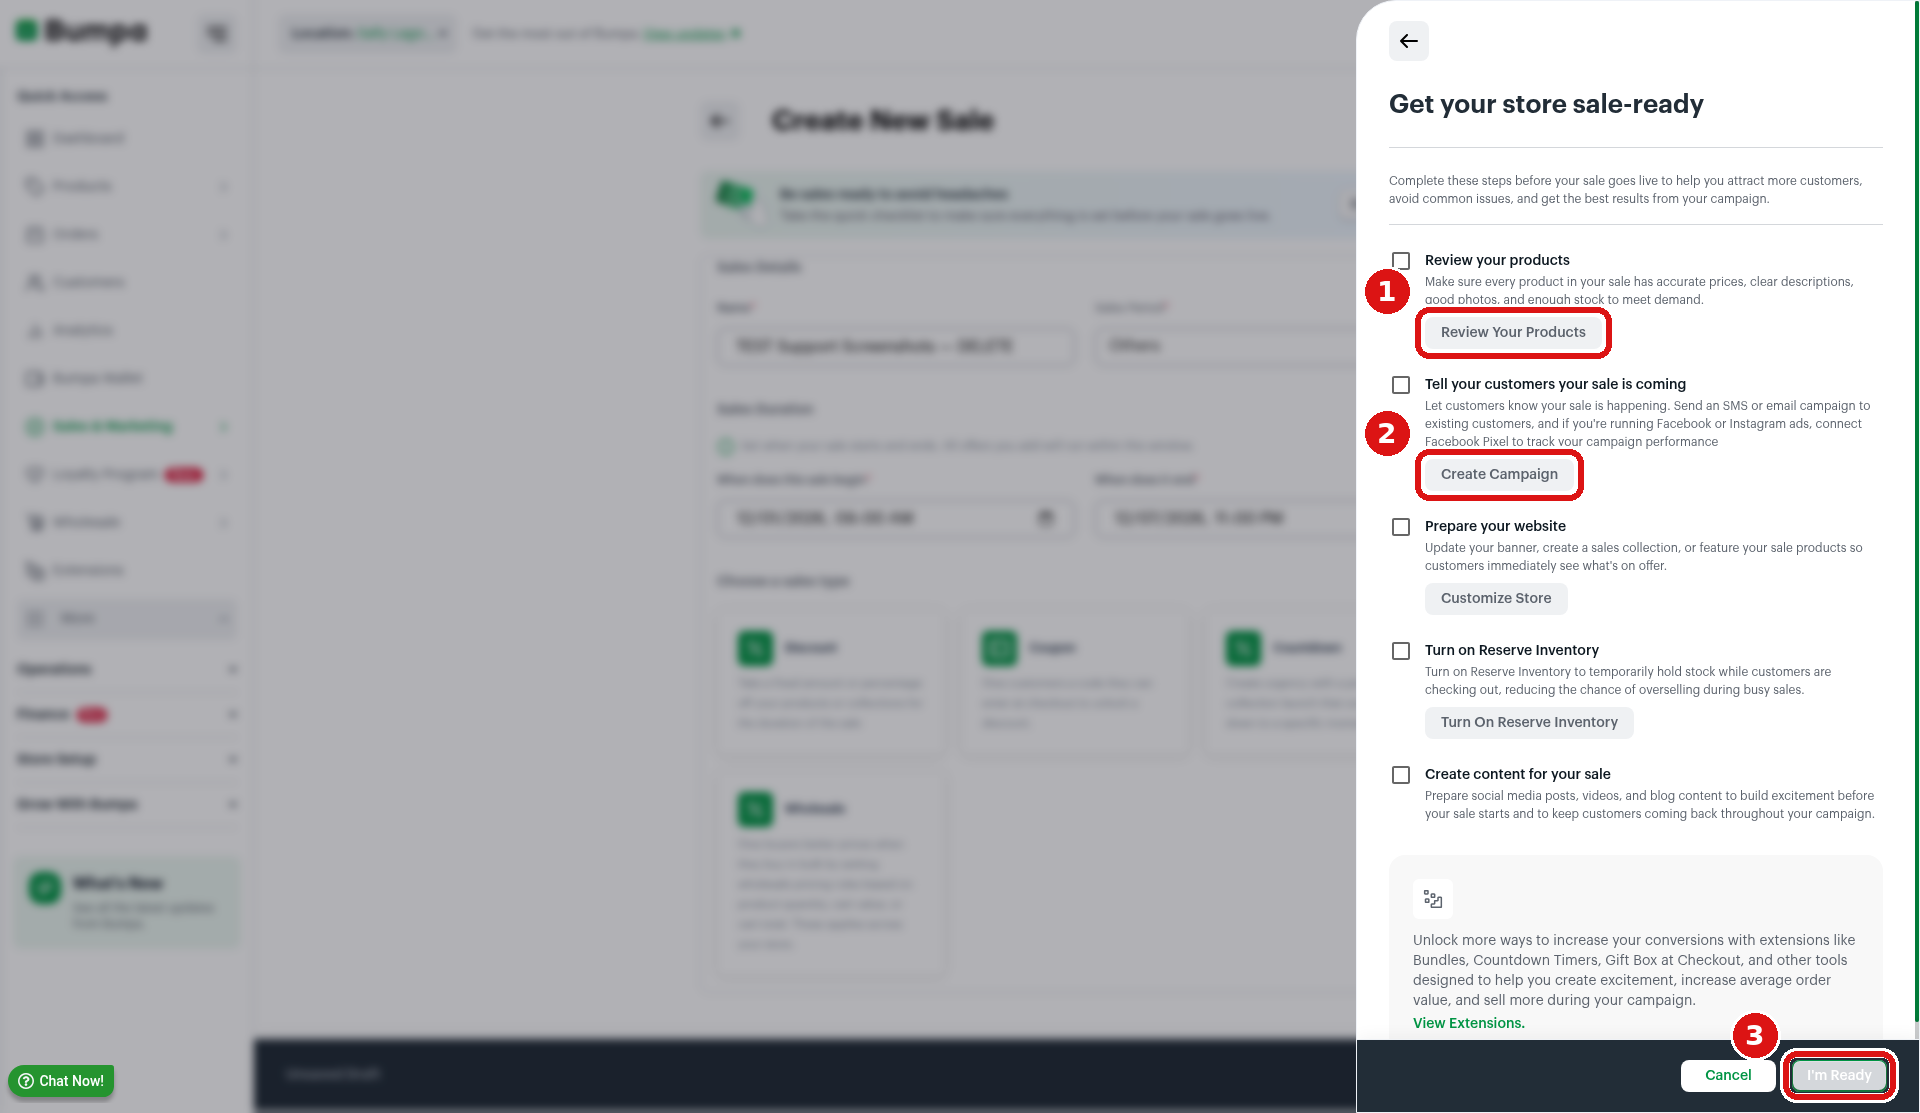
The Get your store sale-ready checklist. 1 = Review Your Products, 2 = Create Campaign, 3 = I'm Ready (bottom right, beside Cancel).
2. Open Sales Hub
The Sales page lists all your past and current sales, and it is where you start a new one.
To open Sales Hub, follow these steps:
Log in to your Bumpa dashboard via app.getbumpa.com.
In the menu on the left, click Sales & Marketing, then click Sales Hub (it has a "New" label).
On the Sales page, click Create New Sale at the top right.
Use the tabs All, Discount, Coupons, Wholesale Pricing and Countdown to filter your sales, and the boxes at the top to see Active Sales, Total orders, Total Products Sold and Total Sales at a glance.
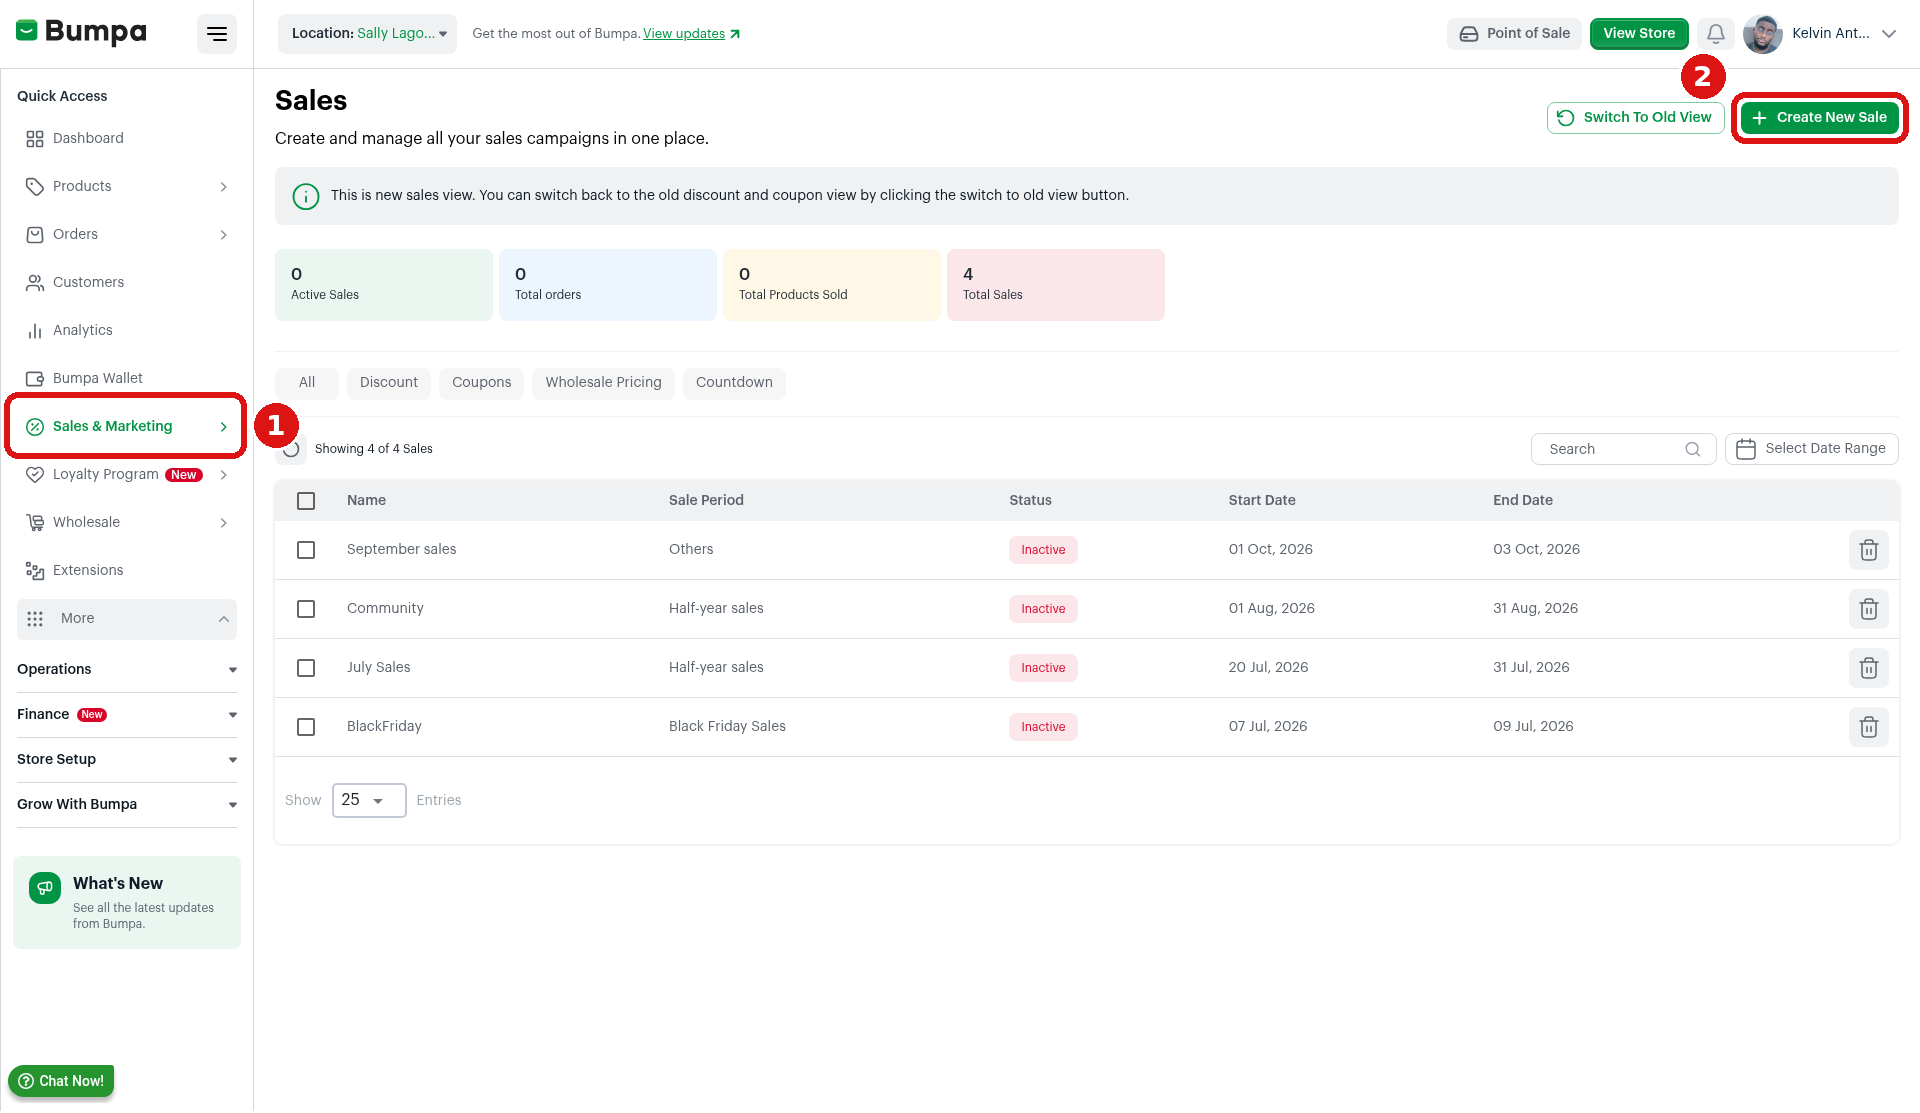
The Sales page. 1 = Sales & Marketing in the left menu, 2 = Create New Sale at the top right.
3. Create Your Sale
A sale holds your promo dates. Everything you add later runs inside those dates.
To create your sale, follow these steps:
Name: type something you and your team will recognise later, for example "Detty December 2026" or "Payday Friday, Nov".
Sales Period: Pick the occasion. The options are New Year, Valentine, Easter, Ramadan, Half-year, Back to School, Clearance, Independence Day, Black Friday, Christmas, Store opening, Birthday and Others. Running an Eid Sallah promo or a Jamhuri Day sale? Pick Ramadan, Independence Day or Others, whichever fits.
Sales Duration: Set when the sale begins and When it ends (date and time).
Under Choose a sales type, click the card you want: Discount, Coupon, Countdown or Wholesale. (Sections 4 to 6 explain each one)
When you have added everything, click Create at the bottom right.
Note: Until you click Create, the bar at the bottom says Unsaved Draft. Click Cancel to leave without saving.
Tip: Start your sale a few hours before you announce it, for example 6am on payday Friday, so it is already live when your WhatsApp broadcast goes out and the first customers click through.
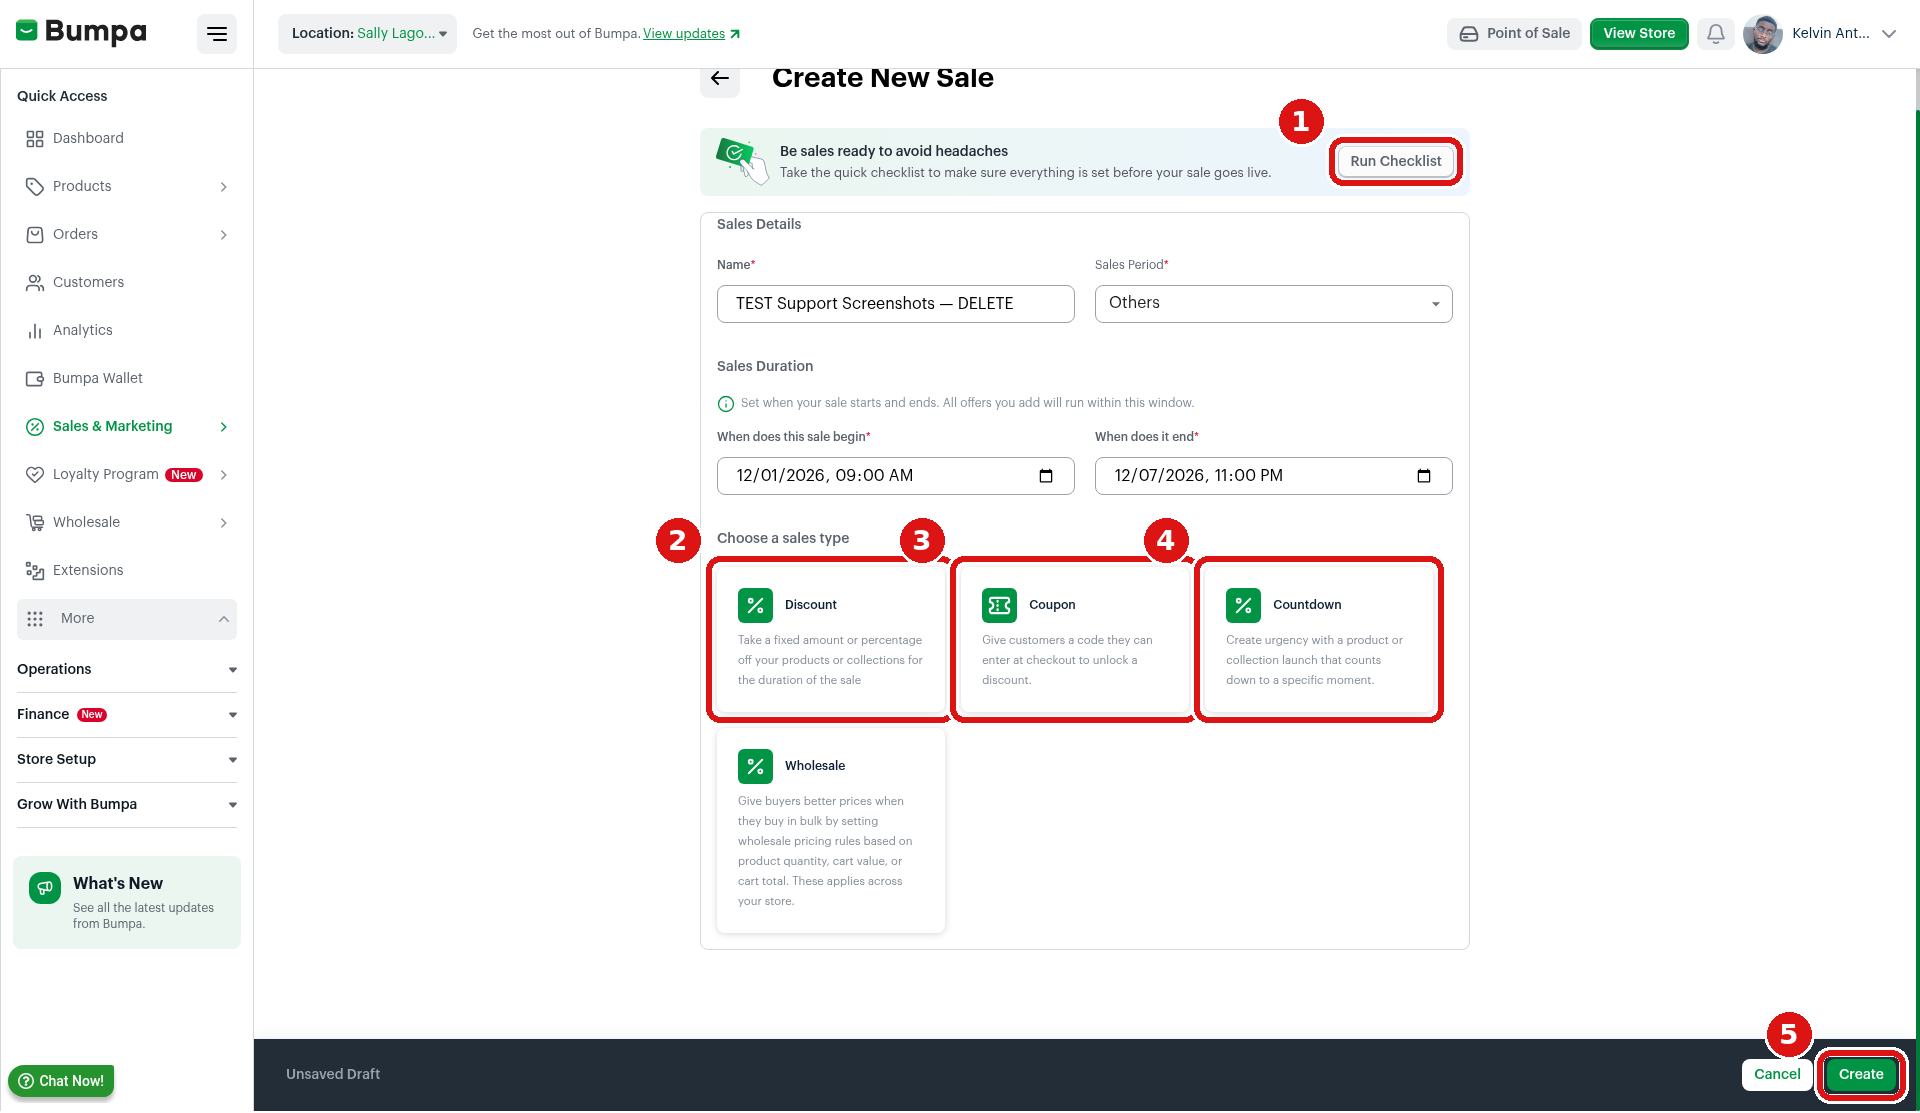
Create New Sale. 1 = Run Checklist, 2 = Discount card, 3 = Coupon card, 4 = Countdown card, 5 = Create (bottom right, when you have finished).
4. Add a Discount
A discount lowers the price for everybody who visits your website. No code is needed, and customers see the new price as soon as the discount starts. Use a discount to clear slow stock, for big seasons like Black Friday or Christmas, or when you want new visitors from your ads to see the deal straight away.
To add a discount, follow these steps:
On the Create New Sale page, click the Discount card. The Create New Discount page opens.
Discount Name: type a name, for example "20% off ankara sets" or "Power bank clearance".
Discount type, choose a Fixed (an amount off, for example ₦2,000 off) or Percentage Discount (for example 10% off), and enter the value.
Maximum discount: enter the highest amount a customer can save, for example ₦5,000.
Discount Validity: Within the Sales Duration: set the Start Date and End Date. They must fall inside your sale dates.
Select Products / Collections: choose what the discount applies to. Use View Selected Products to check your list and Edit Selection to change it.
Click Continue at the bottom right.
Maximum discount protects you on expensive items. For example, 10% off a ₦250,000 phone is ₦25,000, which may be more than you planned.
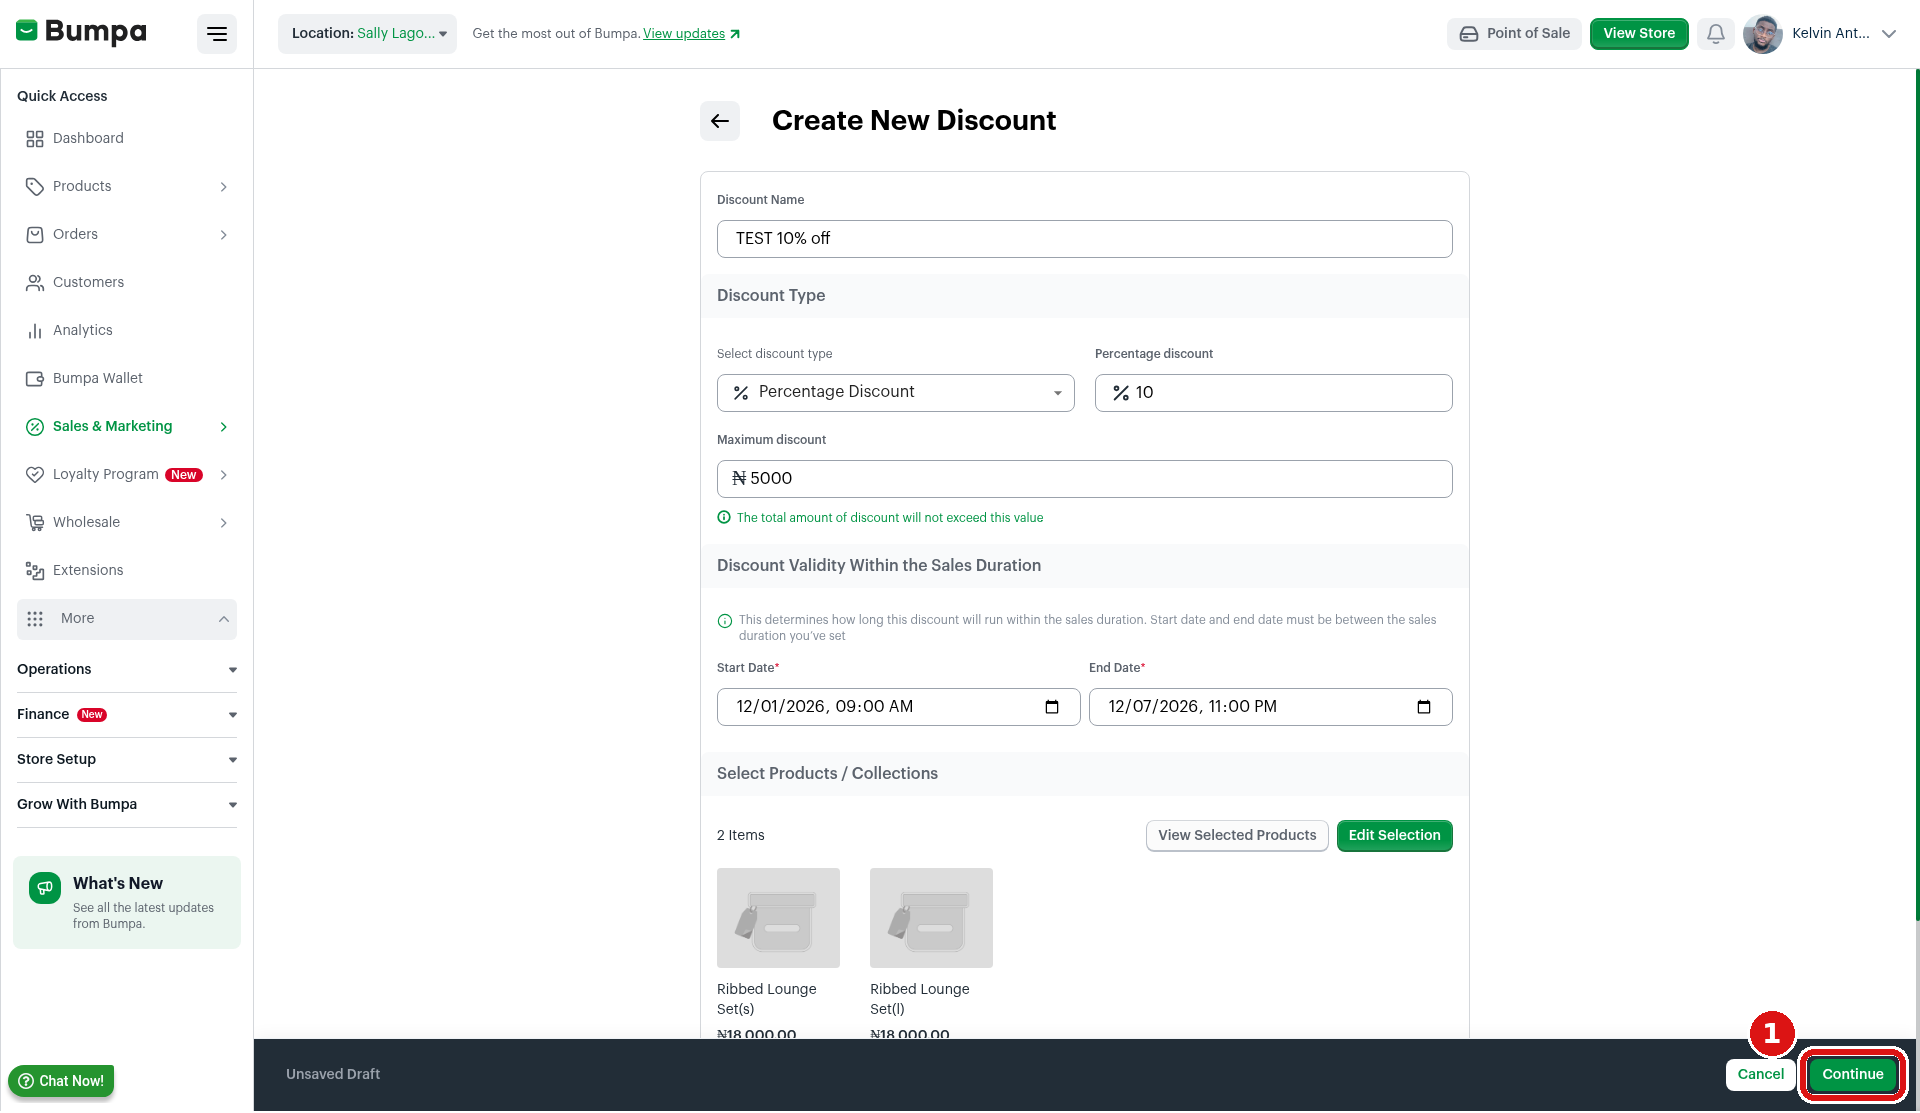
Create New Discount. Check your name, type, amount, dates and products, then click 1 = Continue in the bottom bar (bottom right).
5. Add a Coupon
A coupon is a code customers type at checkout to get the offer. Only people with the code get the discount, so you choose who gets it. Create one code, send it to your broadcast list, Instagram close friends or an influencer's followers, and let the website do the maths. Adding a coupon is optional.
To add a coupon, follow these steps:
Click the Coupon card on the Create New Sale page (or Add Another Sale Type if you have already added a discount).
Under Select Coupon Type, choose Shopping Cart (off the whole cart) or Product(s) (off selected items only).
Under Coupon Details, add a Coupon Description and a Coupon Code. Type your own code (short and easy, for example GLOW10 or LAGOS15) or click Generate Code.
Under Coupon Type, choose the discount type and enter the amount, for example Percentage Discount of 10%.
Set your limits: Maximum coupon discount amount, Minimum cart value and Number of use per customer.
Optional: set Maximum Coupon Usage to cap the total number of times the code can be used, for example "first 50 customers only".
Set the dates under Discount Validity Within the Sales Duration, then click Continue.
Shopping Cart or Product(s)?
Pick Shopping Cart when you want to push bigger orders, for example "10% off when you spend ₦30,000 or more" (use Minimum cart value).
Pick Product(s) when the offer is only for certain items, for example a code for the new lip gloss collection only.

Tip: Give different groups different codes (for example one for your WhatsApp list and one for an influencer). When the sale ends, you can see which code customers actually used.
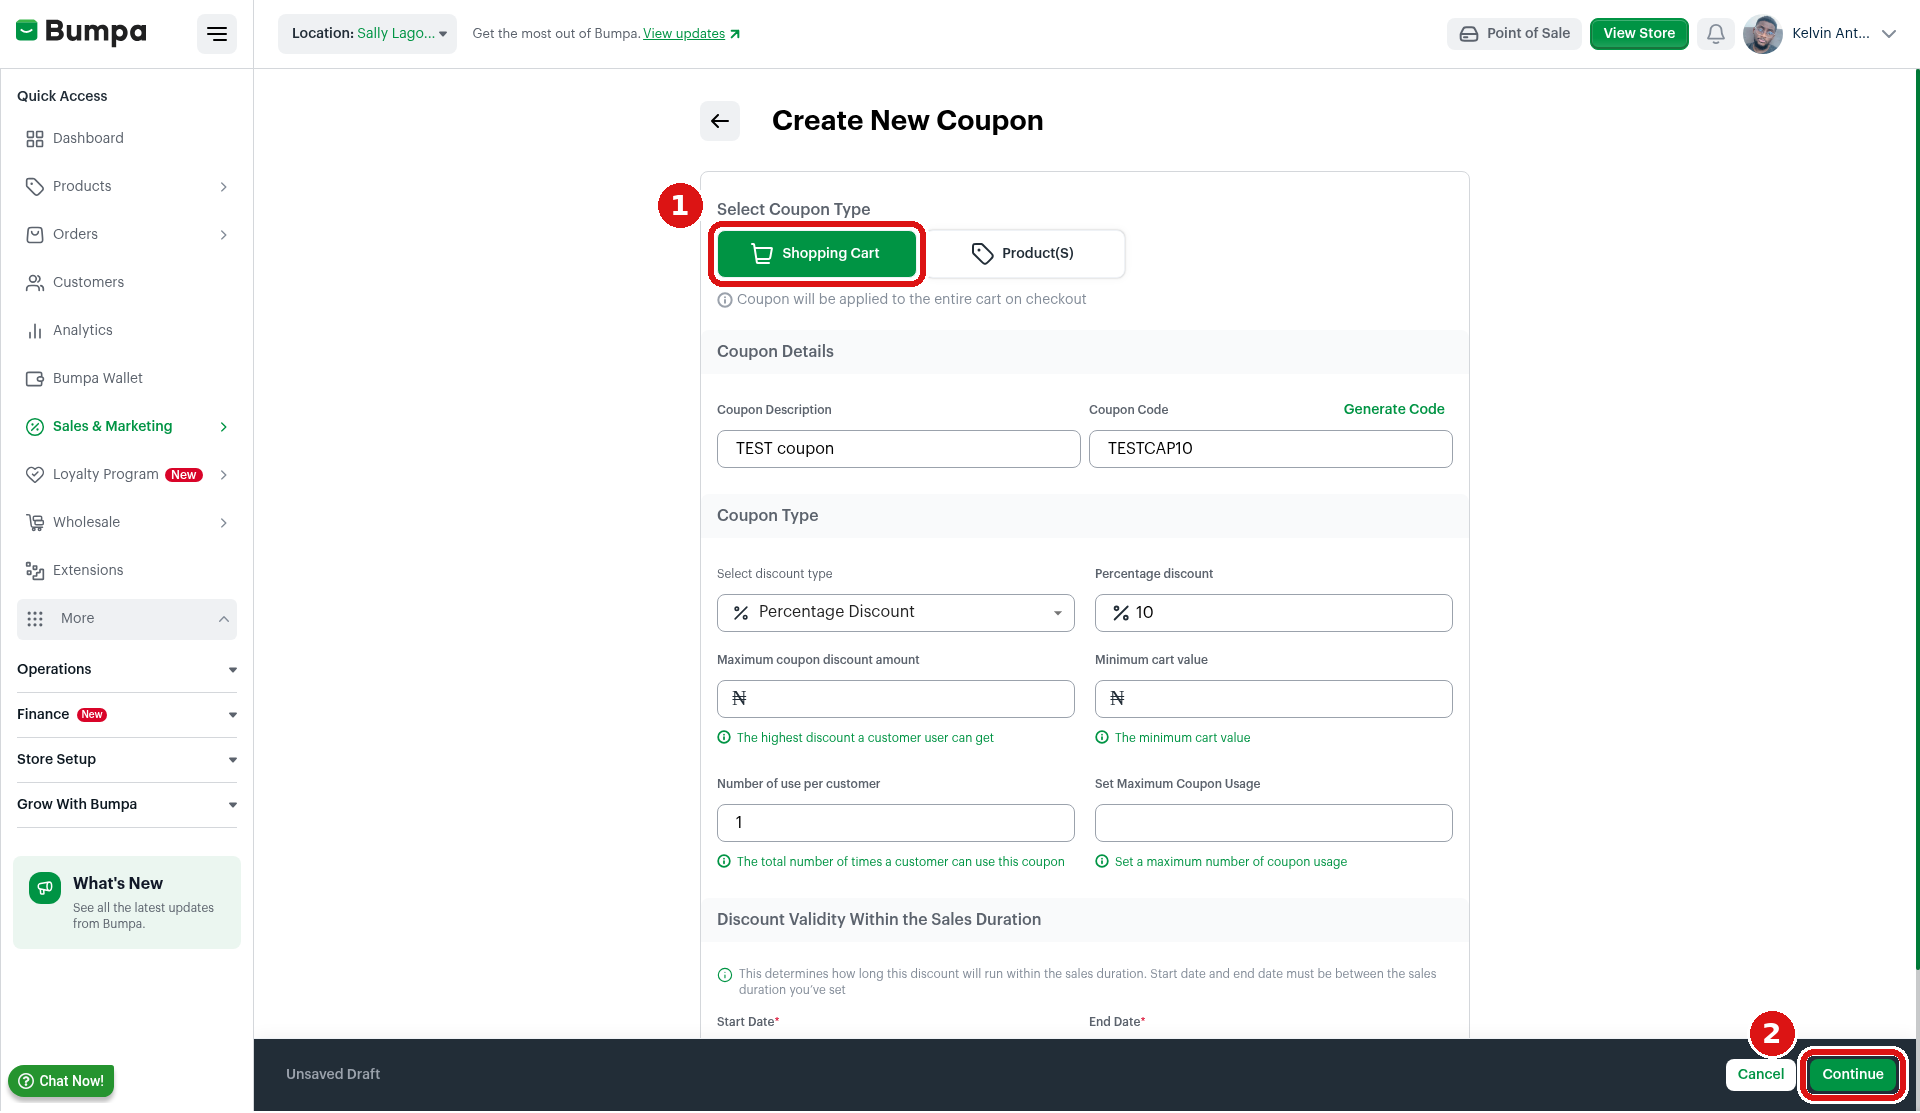
Create New Coupon. 1 = Shopping Cart (or pick Product(s) beside it), 2 = Continue (bottom right).
6. Add a Countdown
A countdown shows a timer on your website. Use it for a new collection drop ("New Eid collection, live Friday 6pm") or the last days of a sale ("Black Friday ends in 2 days"). Shoppers who see the timer often buy sooner. Adding a countdown is optional.
To add a countdown, follow these steps:
Click the Countdown card on the Create New Sale page (or Add Another Sale Type).
Pick the type: Product Launch, Collection Launch or Countdown To Sale.
Add a title, choose the Position On website, and add a subtitle.
Set the dates.
Choose your Countdown Product, then continue.
7. Save Your Sale and Check It on Your Website
Once your sale is created, look at it the way a customer would before you tell anyone about it.
To save and check your sale, follow these steps:
When you have added everything, click Create at the bottom right of the Create New Sale page.
You will see Success: Created successfully, and your sale appears at the top of your Sales list.
Click your sale to open it and check the details.
Click View Store (top of your dashboard) and look at your website the way a customer would. Check that the sale prices are showing, the coupon code works at checkout and the countdown is in the right place.
Do this before you announce: Open your website on your phone, add a sale item to the cart and type your coupon code at checkout (you don't need to pay). It takes two minutes and saves you a lot of "the code isn't working" messages.
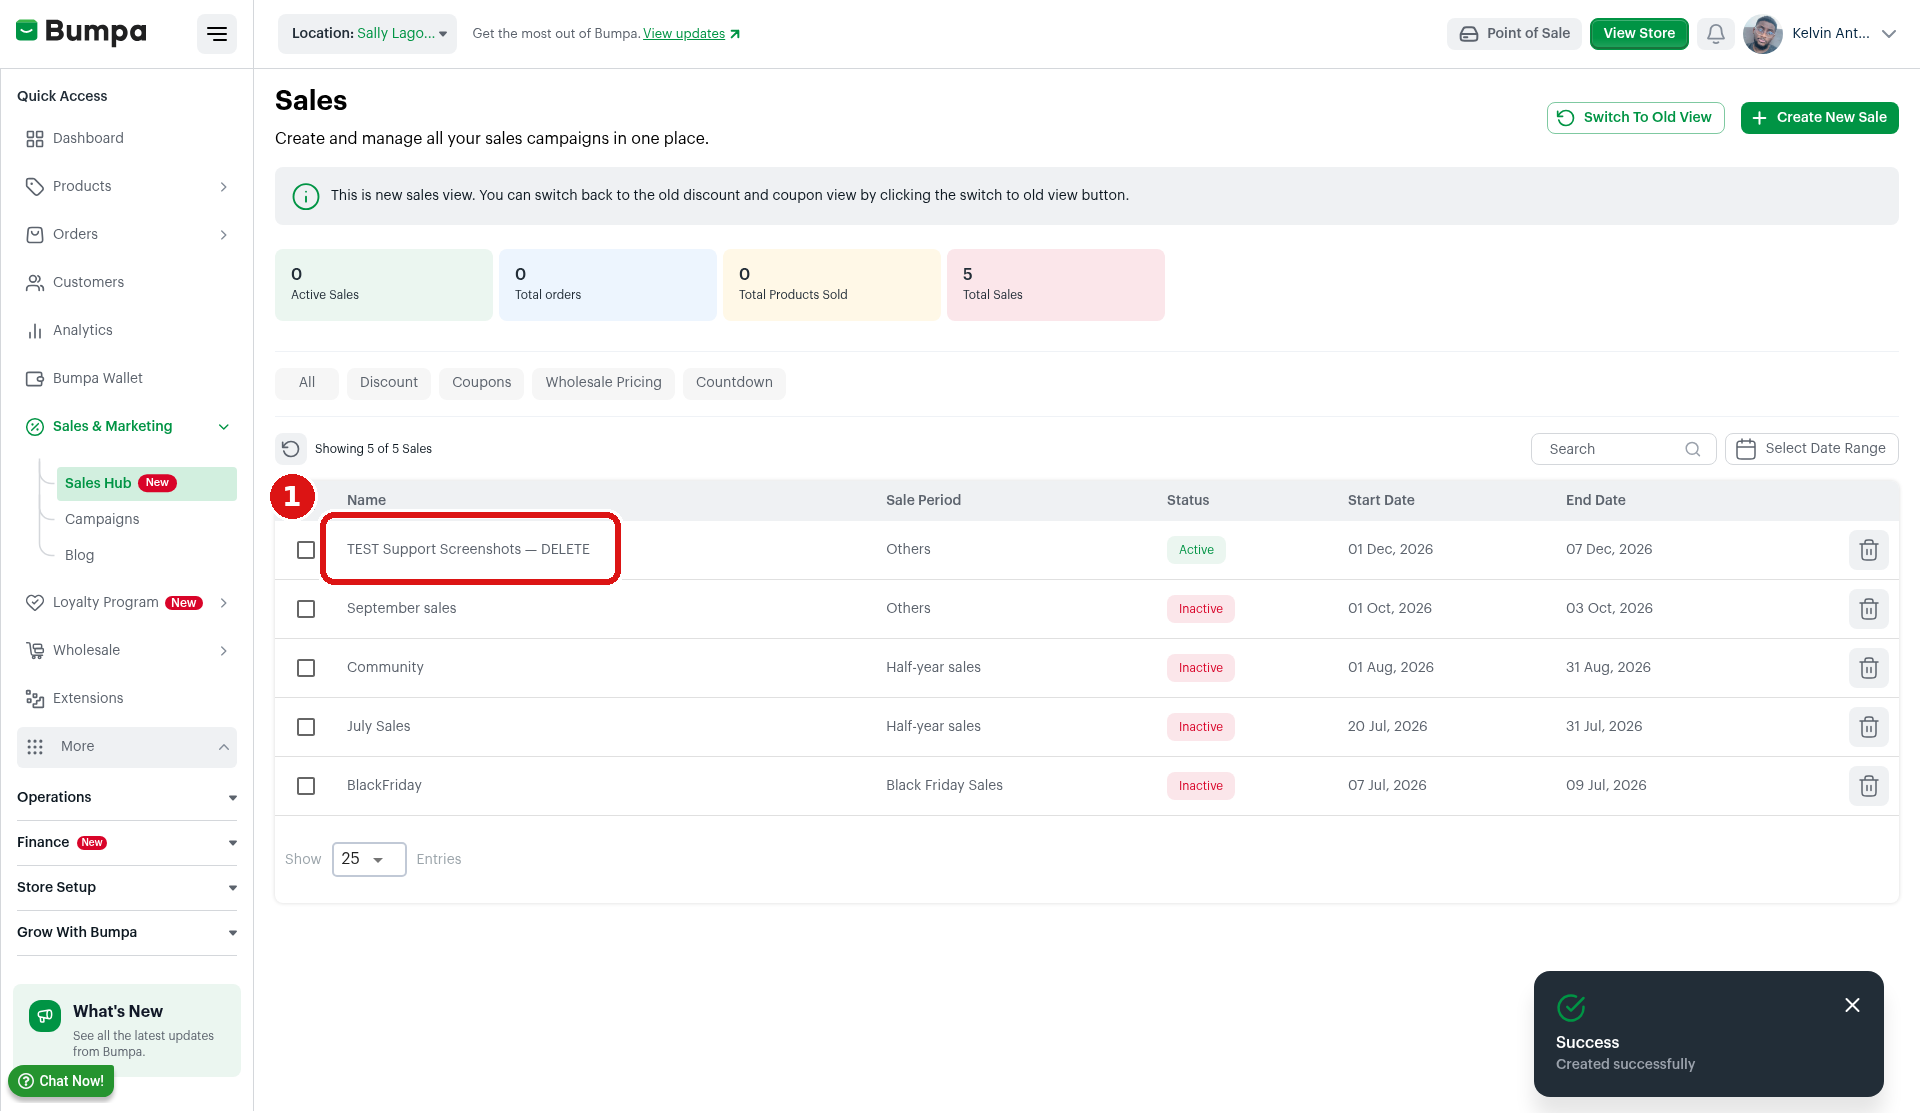
Your new sale at the top of the Sales list. 1 = click your sale’s name to open it.
Inside the sale you will see totals for TOTAL ORDERS, TOTAL REVENUE, BEST SALES CHANNEL, NEW CUSTOMERS and TOTAL PRODUCTS SOLD, plus a Discounts tab and a Coupons tab.
On the Discounts tab you can see the discounted products and the discount details. The Discount Link has a copy button, so you can paste the link straight into your WhatsApp Status or Instagram bio.
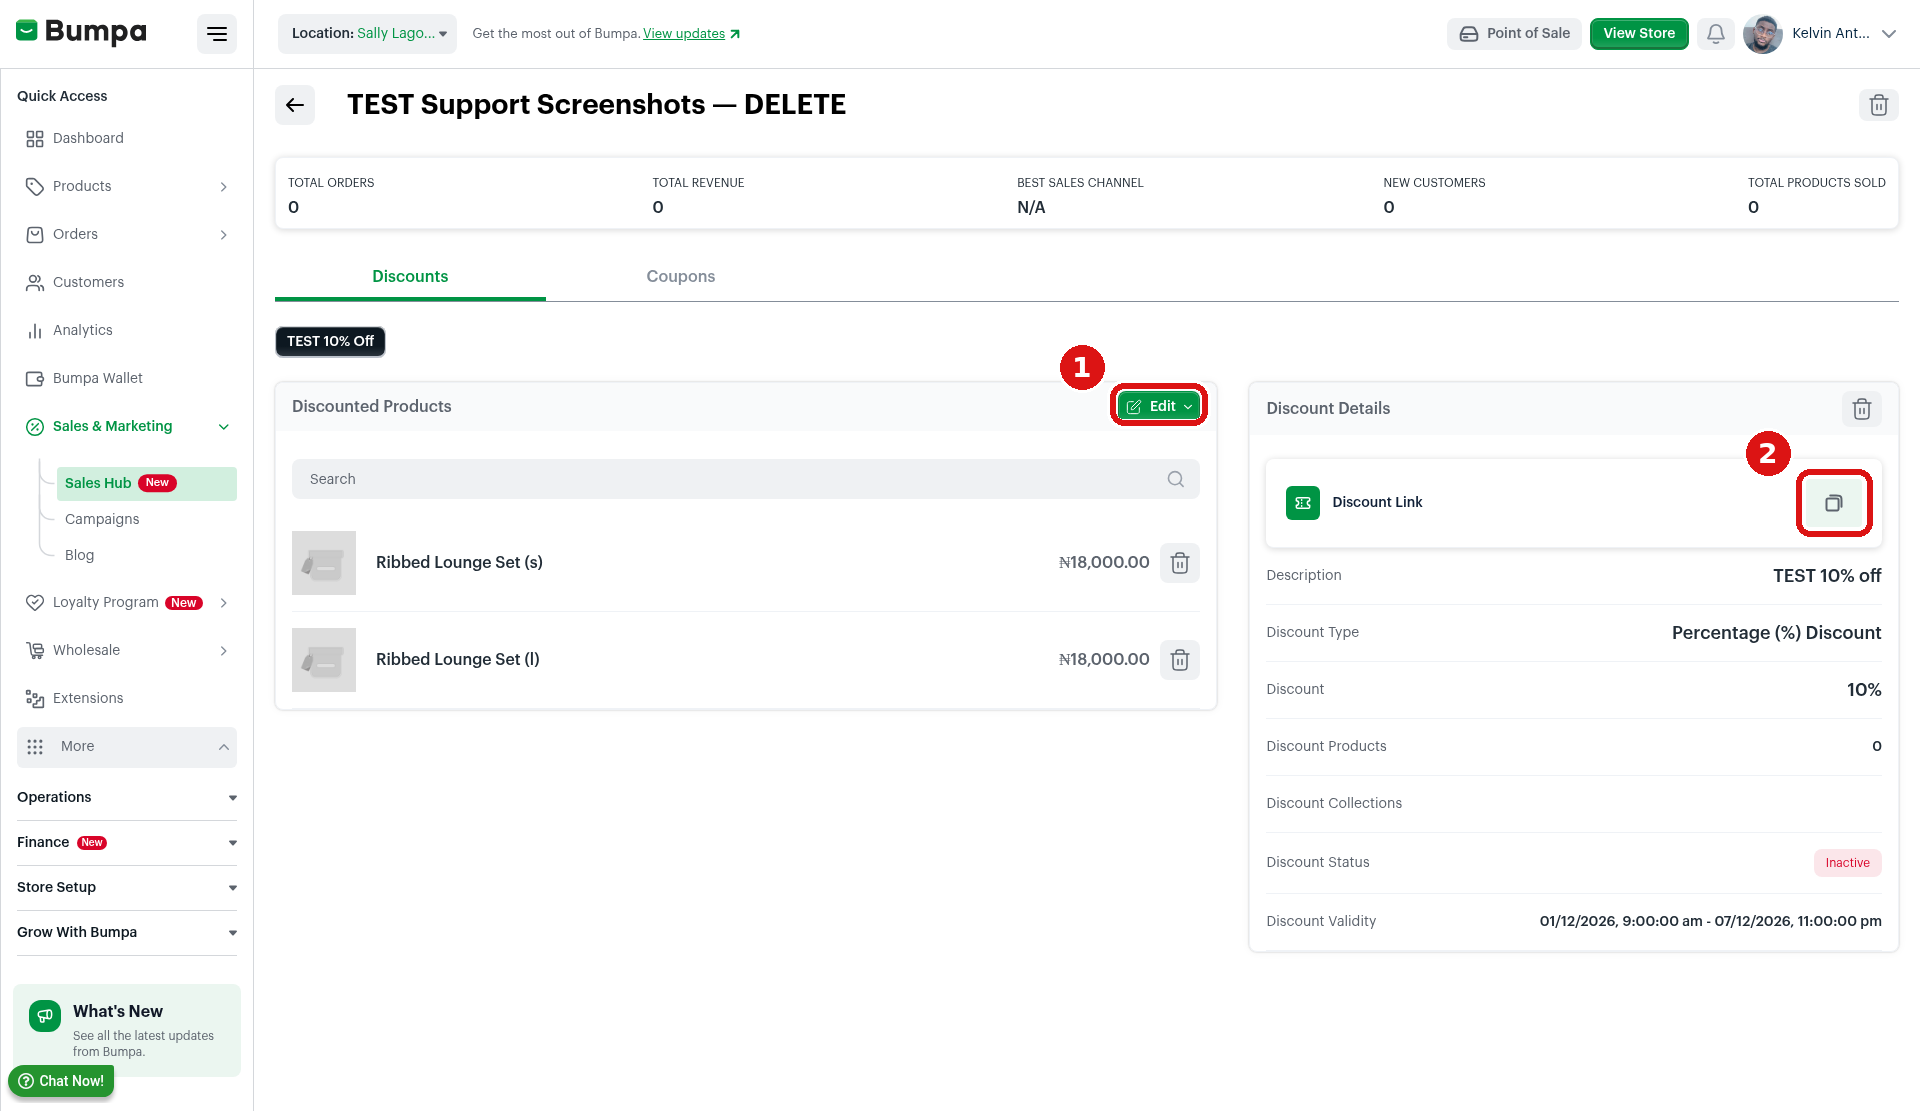
The Discounts tab. 1 = Edit (to change the discount), 2 = the copy button for your Discount Link.
On the Coupons tab you can copy your coupon code and check the limits you set: number of uses, maximum usage per customer, minimum cart value, maximum discount and validity.
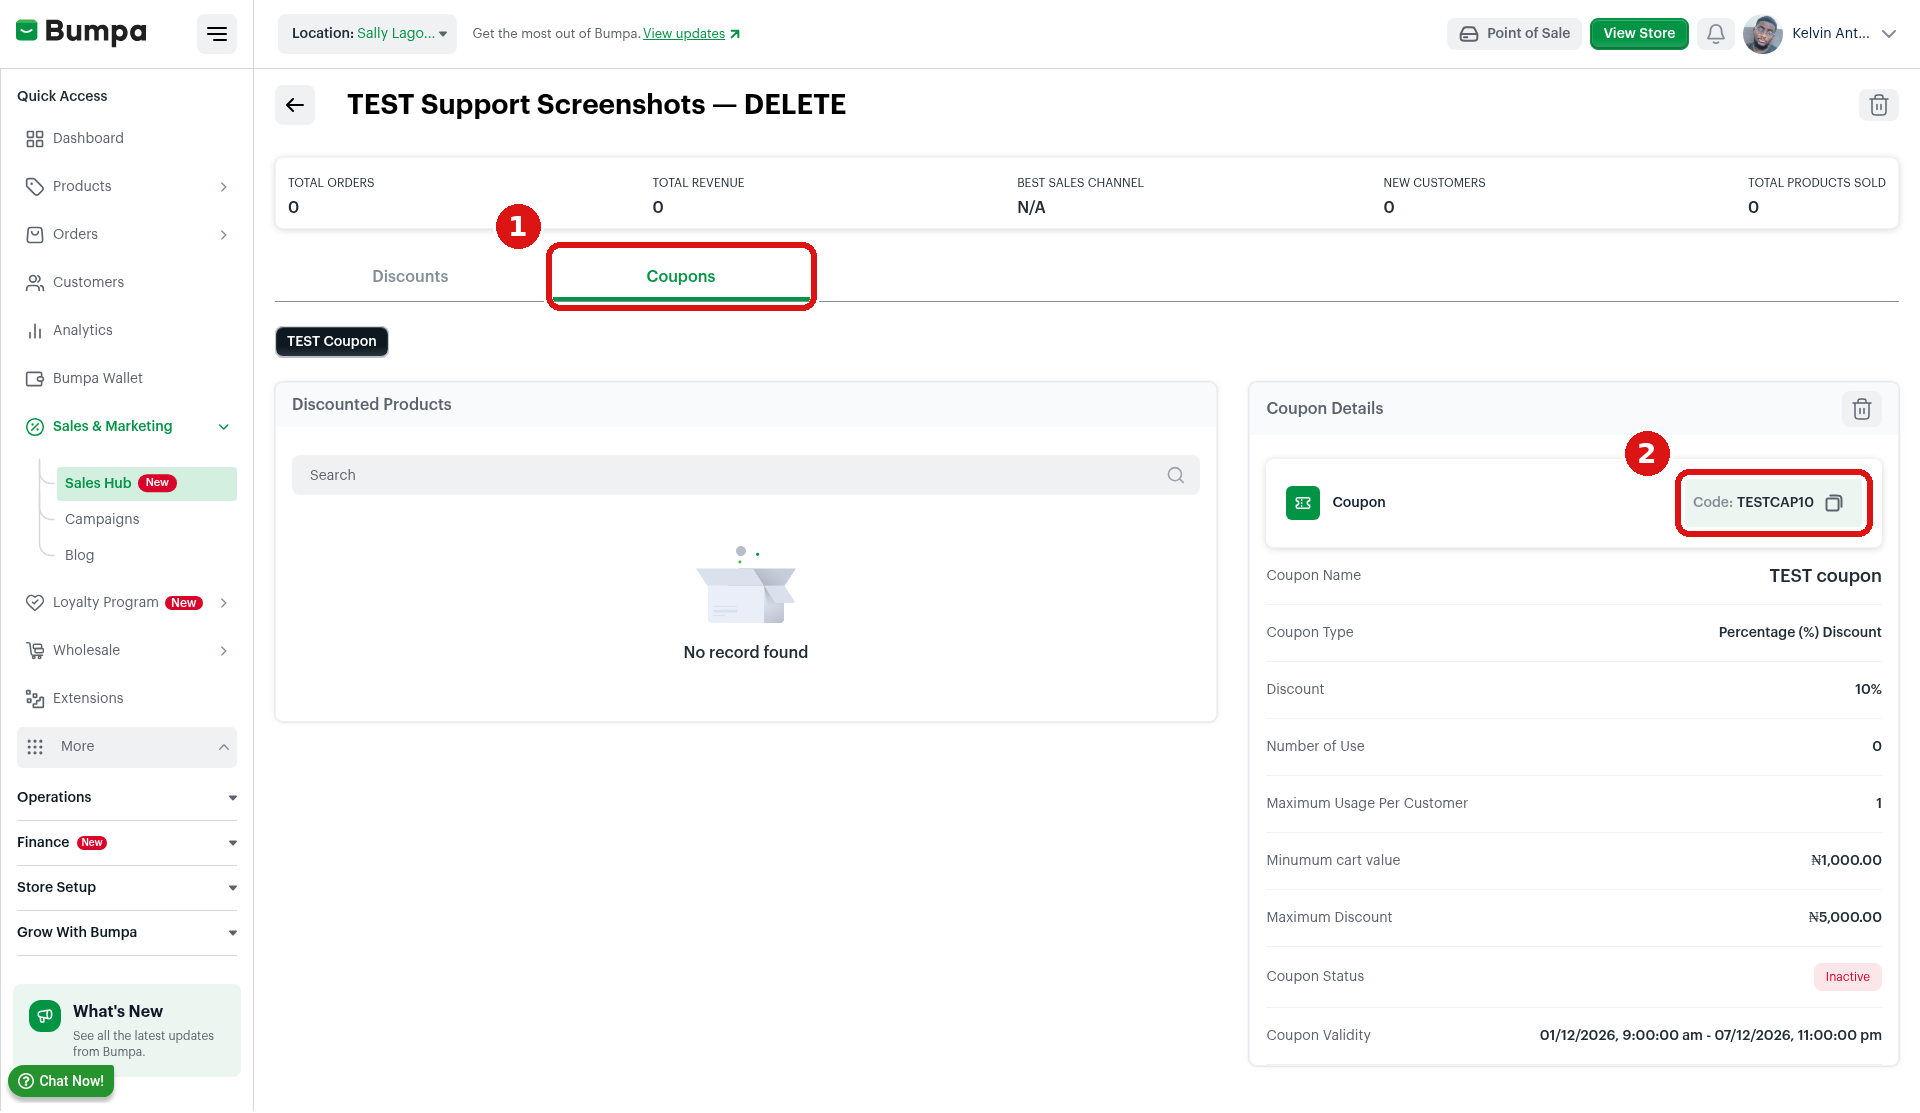
The Coupons tab. 1 = Coupons tab, 2 = your coupon code. Click the copy icon beside it to copy the code.
8. Extend a Discount
If the sale is going well and customers ask for more time, you do not need to create a new sale. Keep the same sale and the same products, and just move the end date.
To extend a discount, follow these steps:
Open your sale from the Sales list and stay on the Discounts tab.
Click Edit.
Choose Extend Discount Date to pick new dates, or Add New Item to add more products to the discount.
Save your changes, then check your website again.
For example: An Abuja accessories seller ends a Black Friday sale on Sunday night, sees that orders are still coming in on Monday morning, and extends to Monday in two clicks.
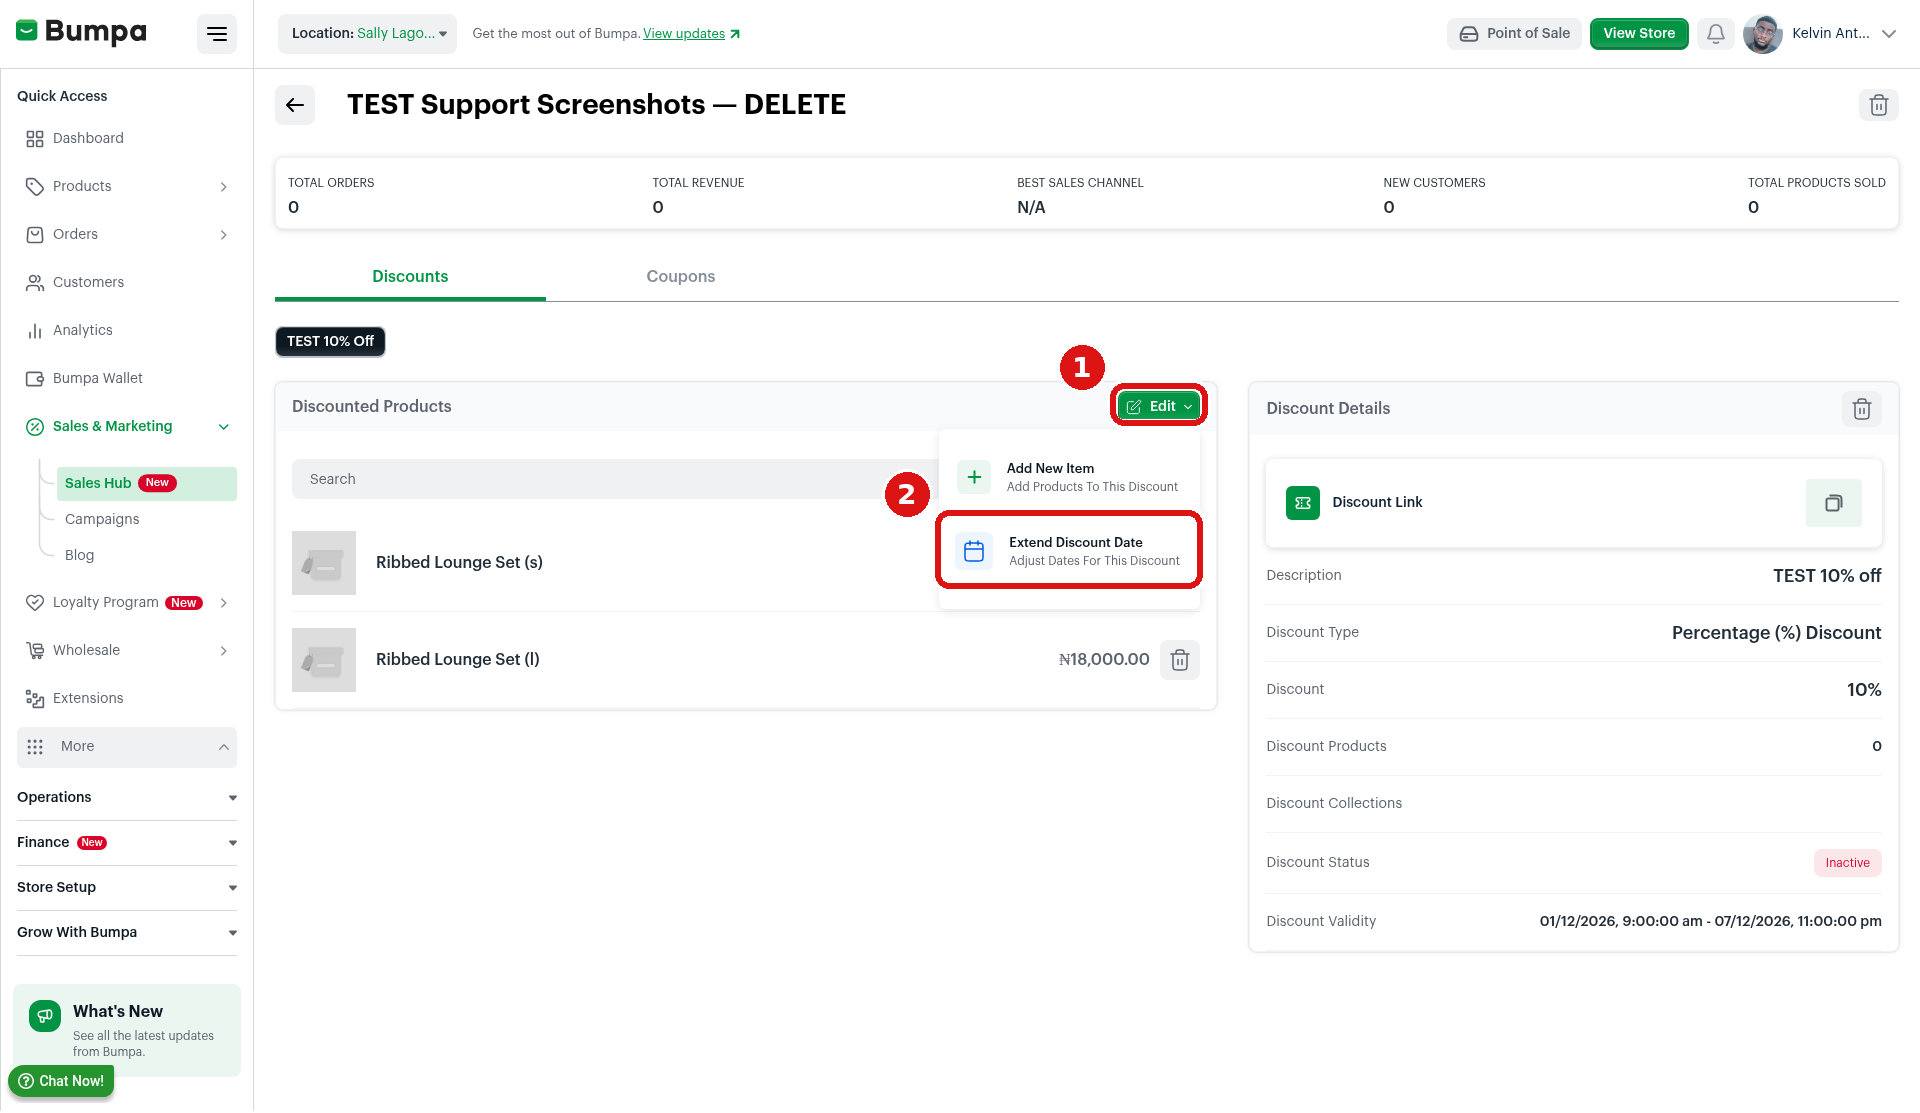
1 = Edit, 2 = Extend Discount Date (Add New Item is just above it).
9. Read Your Sales Report
Within 12 hours after your sale ends, Bumpa prepares a PDF report. It shows orders and revenue (compared with your last sale), new vs returning customers, your best selling products, your peak sales hour and more. You can also open the sale in Sales Hub at any time to see total orders, revenue, best sales channel, new customers and products sold.
Use it to plan your next sale. If most orders came in at 8pm, send your next broadcast at 7pm. If a code brought in lots of new customers, use that influencer again. If one product barely moved even at 20% off, check the photos, not only the price.
10. Manage Your Sales
A few more things you can do in Sales Hub:
Discount and coupon in one sale: on the Create New Sale page, add one, then use Add Another Sale Type to add the other.
Delete a sale: on the Sales list, click the bin icon next to the sale (or tick several sales). When asked "Are you sure you want to delete selected sales", click Yes, delete.
Switch To Old View: you may still see this button on the Sales page. We recommend using the new Sales Hub view for all new sales.
Sales Hub works the same way for Kenyan stores.
Related Articles:
Was this article helpful?
That’s Great!
Thank you for your feedback
Sorry! We couldn't be helpful
Thank you for your feedback
Feedback sent
We appreciate your effort and will try to fix the article